
Showing posts with label My House. Show all posts
Showing posts with label My House. Show all posts
Wednesday, February 29, 2012
You may be wondering if my momentum from the first two weeks in my new house have continued over the last 8 months of working 60-80 hours a week. Well, I would say it has slowed but not stopped. Here are some update pics of the major rooms, move-in day compared to now, and the projects still to go!
Dining room:
 |
| Move in day... very yellow. |
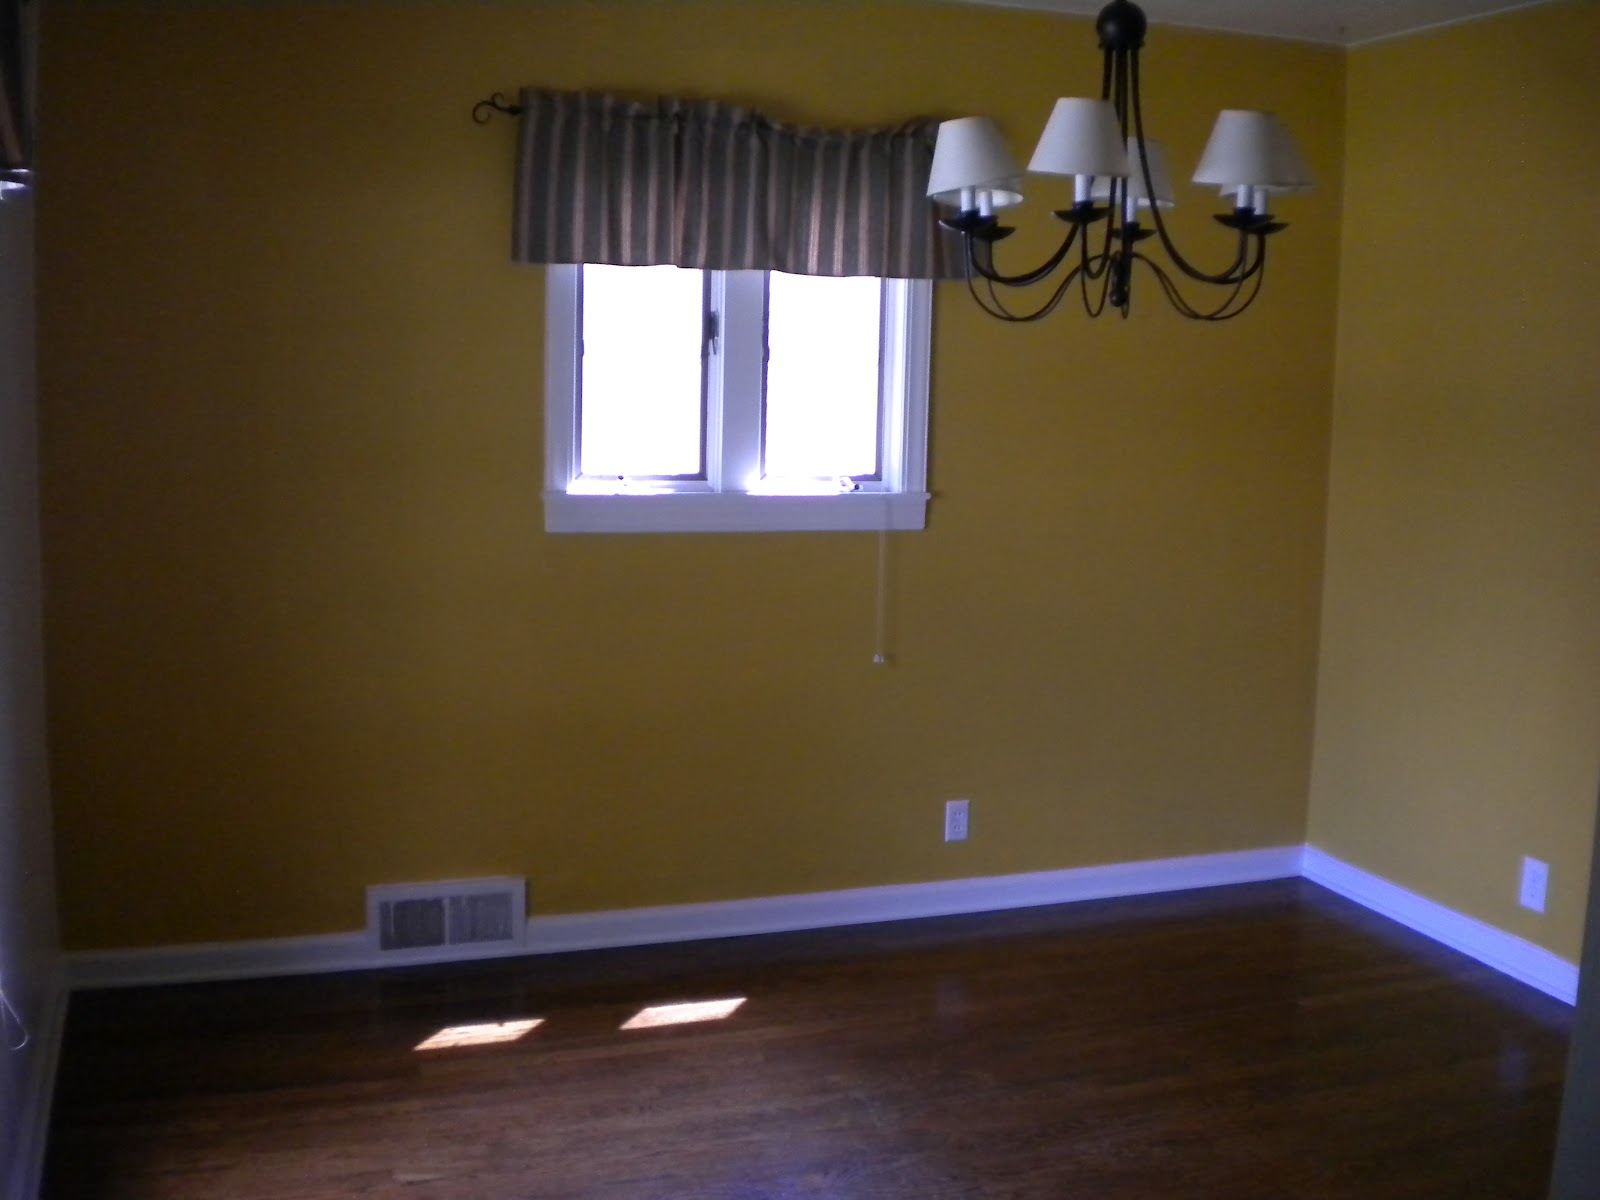 |
| I'm digging the crooked light fixture |
 |
| Love the big window. |
 |
| Today |
Still to do: Paint table white, add stuff to walls.
Guest Bedroom:
 |
| Slightly after move in day... |
 |
| Painted, got a bed, added ceiling fan |
 |
| Curtains, shelves, etc. |
Still to do: Add a headboard, couple things on the wall.
Master Bedroom:
 |
| Move in day... empty. |
 |
| Move in day... note the missing outlet covers. |
 |
| Today, walls painted, mirror up, new(ish) bedding, cat. |
 |
| Today: Bedside tables, white ceiling fan. |
 |
| Today: Stuff on walls, curtains, lots of sunshine (it was nearly 70 today!). |
Still to do: Paint doors white, flowers in vases.
Living Room:
 |
| Move in day: Wooden fireplace, pink/orangy walls, big picture window |
 |
| Move in day: Kinda tunnel-like, missing outlet cover. |
 |
| Today: White fireplace, new sectional, coffee table, rug. |
 |
| Today: Bookshelf, picture window, entryway. |
Still to do: Fun chair for the corner by the TV, hang mail holder by front door, move around artwork, add mirror over fireplace?, get real flowers to replace fake ones.
Kitchen:
 |
| Move in day: Green metal cabinets, broken sink hose, old linoleum floors. |
 |
| Move in day: lots of bisque appliances. |
 |
| Today: White cabinets, new stove, trash and recycling, new faucet/hose, new hardware, new light fixture, old floors are still there. |
 |
| Today: Shelf painted white, wine rack, extra counterspace, homemade window treatment, awesome mixer. |
Still to do: FLOORS!!!! They are in truly terrible shape. It may or may not have to do with me dropping a heavy metal cabinet door on them from 5 feet in the air... they turn white with water. They need to go. Also, replace counters, maybe replace sink, get new(ish) white appliances to replace DW and fridge, maybe add backsplash.
Other projects in the works (or in my head):
Redo full bath
Add beadboard to half bath and repaint
Paint sunroom
Add door to basement with cat door
Restain deck
Redo front landscaping
Paint trim in various places
Paint downstairs hallway/hang art
Progress is being made!
Peace out,
Kari
Monday, November 28, 2011
Sorry I didn't write anything about vacation after the first day. There was much pie eating and shopping and no time for computers. I thought I'd pop in with a little house updating since I haven't done that in a long time. Here are some shots of how my dining room has changed over the last 5 months...
This is what it looked like on move-in day. Very yellow.


I painted three walls chocolate brown with the front wall a light grey/beige color (that runs into the living room also). The big picture window in the front lets in enough natural light that it doesn't make the room to dark or feel small. After painting, the dining room became a great staging area for many many tools... and it looked like this.


That's a lot of stuff. The plan is to put up some shelves, pictures, frames, etc to break up the dark chocolate. I also want to add some color but not sure what or how yet. I did template out and put up some floating white shelves. Very precise measuring going on here...

Take notice of the wonky lopsided light fixture seen above. That was one of the things I really wanted my dad to help me replace while he was here. I thought about refinishing it, but just couldn't get it to hang right and get the shades to sit level. So I ditched that idea in exchange for a nifty modern drum light.

Ooooo. So this is what I have now, after putting up the shelves and adding a bit of different decor to the table...


Things I still want to do include:
Add a runner to the table
Paint the table a chairs an antiqued white
Add more things to the wall
Get a hutch/buffet/small server sort of thing
Maybe add a rug...
It still looks kind of naked, but it's getting there!
Thursday, October 20, 2011
After four months (and 4 days) of living in my house, I FINALLY have a room I can show you that's (almost) done.
It figures it's the guest room... the room that gets less regular use than any other. Oh well, at least I'm making progress somewhere!


It figures it's the guest room... the room that gets less regular use than any other. Oh well, at least I'm making progress somewhere!
When I last left off, I'd painted the room a nice neutral tan color, and put linens on the bed. And by bed, I mean air mattress...

Since then, I've done a few things.
1) Put a real mattress in the room. On a frame. Talk about an upgrade...
2) Moved the bed from the short wall to the tall wall.
3) Moved the dresser to the corner
4) Added a couple new lamps
5) Put some floating shelves up with my black cat collection.
6) Put a stool, vase, and rug in the corner... because it was really empty...
7) Bought new guest towels and such, and put them in a little chest, because it's cute...
8) Hung curtains, which I tried to hem, but left too long. Whoops.


I still have a few things to do to finish it up...
1) Put a picture in the picture frame that doesn't still have the price tag on it...
2) Re-hem the curtains (ahem, mom...), or I could just wash them and see how much they shrink.
3) Put some sort of nightstand on the other side of the bed.
4) Take down the boring light fixture and put up ceiling fan (from my bedroom) (ahem, dad)
5) Hang something above the bed/on the short wall... it's a little empty over there.
6) Figure out how to get the screw out of one particular switch plate, which I accidentally broke in the paint prep process, and now can't put a new cover on... (ahem, dad, again).
7) Sweep.
That's about it! Definitely making lots of progress, and I've pretty much stalled until the parental reinforcements show up with their respective life skills and share them with me...
So come visit!
Peace out,
K-Dawg
Tuesday, September 27, 2011
You should probably have a mattress that fits them.
Let me tell you a little story. It's a story about a mattress. And some sheets. But we'll start with the mattress. This little mattress was purchased sometime back in the 1980's. First, my parents slept on it for a while. Then, it got moved into my bedroom when they got a new one. This was a big time upgrade, since it was a queen size mattress. Woot woot!
Then, when I went to medical school, I took this mattress with me. Then, when I moved to Indiana for residency, I took it with me again.
This mattress is more traveled than most college graduates.
(Remember, it's life started in the 1980's. I was born in 1985. So it's pretty close to my age. How close? I've never asked when EXACTLY they got it... I prefer not to think about those things).
So, the mattress settled into life in Indiana. At the same time as the move, I ordered some nice new sheets from my mom's friend. Good, high quality, very comfy sheets. When they arrived, I put them on my mattress and...
Wop wop.
The mattress was so old and thin that the fitted sheet went the whole way around the mattress AND box spring.
Sad.
So I decided I needed to go mattress shopping. The old mattress was destined for the guest room, and my bed needed something with a little more fluff. After doing mucho research (okay, no mucho, but some), I settled on checking out Denver Mattress Company. They got good ratings from Consumer Report, and there happens to be one right down the street.
I was looking for something on the affordable side, since eventually I plan to move the new mattress into the guest room, toss the one that's my age, and get myself whatever mattress I dang well please.
There were many good options, and I narrowed it down to the Arapahoe, Breckenridge Memory Foam, and Breckenridge Latex. When I found out that I could save $100 if I got a mixed box spring and mattress set, the Breckenridge suddenly became much more affordable, and I decided to go with that. Seriously, who WOULDN'T get the mixed set? No one looks at the box spring anyway...
Anyway, once I picked the Breckenridge, I had to decide between Memory Foam and Latex. I asked the sales guy every question I could think of to figure out what the difference was. Durability? Firmness? Thickness? Hypoallergenic-ness? Nothing... And I couldn't tell a lick of difference sitting on them. I eventually went with the Memory Foam, for no other reason than it sounds more comfortable than Latex.

Isn't it purdy?
And the best part: The fitted sheet actually fits on the mattress. Ahh, the life of luxury. Wyatt isn't thrilled about it though, because he has to jump a lot further to get on the bed.
The guys at the store warned me that getting used to a new mattress may make you sore for a couple days. Ha. I've slept like a rock every night.
And in the grand mattress circle of life, the old mattress is in my guest room, and my parents will get to enjoy it again when they come visit at thanksgiving.
And, if you're wondering, buying a mattress, it probably the most adult thing I've ever done. Ranks above buying a house, owning a stand mixer, and even mowing my own lawn.
Welcome to adulthood!
Wednesday, September 14, 2011
I thought I'd pop back in and let you know how my painting extravaganza turned out. It took a TON of paint to cover what is a pretty small bedroom. As in, more than a gallon. As in I had to run to Lowes yesterday morning to get more paint. As in my arms no longer go above my head from reaching to paint the sponge-like ceiling.
But, it was all worth it in the end, because the guest room no longer looks like a 10 year old boys room... which it was a mere 3 months (minus 2 days) ago.
Here are the before shots again. I meant to snap one of the spider man light switch plate, but I was too busy taking it down. Sorry.

 Clearly I was already started when I took these pictures. Because I was painting the ceiling, I had to cover the whole room in plastic. This proved a challenge when selecting painting footwear. I tried to go barefoot but the plastic kept sticking to my feet, and I had to walk like I had drop foot. Then I put on socks and it was like trying to walk on an ice rink. I ended up in shoes. Good thing I have a lot of old pairs that can get paint-y.
The top picture has a couple paint swatch options up, none of which are the one I actually chose.
When I started painting, I realized that no only were there planes on the walls, but there were also stars all over the ceiling. I think they'd been painted over with a coat of primer before, but you could definitely still see them.
Not anymore.
They've been buried. By Ashen to be precise (of the Olympic Premium No-VOC variety to be even more precise). A coat of high coverage primer, and two coats of paint later, this is where we are.


But, it was all worth it in the end, because the guest room no longer looks like a 10 year old boys room... which it was a mere 3 months (minus 2 days) ago.
Here are the before shots again. I meant to snap one of the spider man light switch plate, but I was too busy taking it down. Sorry.


The top picture has a couple paint swatch options up, none of which are the one I actually chose.
When I started painting, I realized that no only were there planes on the walls, but there were also stars all over the ceiling. I think they'd been painted over with a coat of primer before, but you could definitely still see them.
Not anymore.
They've been buried. By Ashen to be precise (of the Olympic Premium No-VOC variety to be even more precise). A coat of high coverage primer, and two coats of paint later, this is where we are.


So, ignore the fact that there's practically no designing going on here. Also ignore the fact that there's an air mattress on the floor. It'll be spruced up in due time. Here are some of the plans I've got in my head...
Change out the light fixture for a ceiling fan. I'm moving the fan from the master BR into this room, and hanging a new one in the master. I'd have done it myself, but the breaker wasn't labeled for either bedroom, and I didn't feel like running up and down from the basement to figure out which one it was. Also, I didn't want to electrocute myself and die.
Hang some B&W photographs in colorful frames (red, maybe?) and putting some floating shelves up for more decorating schtuff.
Put a rug in front of the bed.
Get a bed. That one's on the short list. I'm going mattress shopping this weekend, so hopefully by next weekend, there will be a real bed in place of the air mattress. Let the house guests arrive.
That's about it for now. I'm quite happy with the color choice. It's nice and neutral, and will make it easy to change things up in there if I so choose. It also looks really nice with the tones in the wood floors.
The last room left on the short list of things to paint is my bedroom... suggestions? I'm not tackling that one solo because I have some giant pieces of furniture that need to be moved. So I'm waiting to the reinforcements to arrive first...
Oh, and in other news, I found my dining room table yesterday. Very exciting. More pictures to come soon. Although tomorrow I go back to work, so the home improvement projects will slow down. Wop wop.
Cheers,
Kari
Monday, September 12, 2011
You may remember me talking about my kitchen cabinets. My plan to give them a quick coat of paint was upended when I discovered they were not normal cabinets, but old (probably original to my circa 1947 house) metal cabinets that no one had given any attention to since... ever, probably. I estimate there are 5 coats of paint on the cabinets, some of which are peeling off. There is grime and rust on the tops of the doors (which I don't think anyone but me has actually ever looked at). And the shelves have definitely never been washed.
When I was cleaning out the cabinets (actually, Ian was doing it while I was downstairs scrubbing shelves), I discovered something that confirmed my theory that no one had actually looked in the back of the cabinets in many many years.

Sad to say, the blue airplane stencil had to go. Stay tuned for the after pictures. They're gonna be sweet. I hope.
Peace out,
Kari
PS. Yes, I tossed all the extra percocet. After 24 years (FYI, that's just two less than I've been alive), I'm pretty sure it's expired.
When I was cleaning out the cabinets (actually, Ian was doing it while I was downstairs scrubbing shelves), I discovered something that confirmed my theory that no one had actually looked in the back of the cabinets in many many years.
 |
| Names of patient and prescriber erased to protect the innocent. |
Why yes, that is bottle of 100 percocet from 1987. I'm glad you asked.
Now, this bottle tells me lots about previous homeowners.
1. They were probably not drug dealers. The bottle was pretty much full.
2. They apparently weren't in much pain.
3. They never ever looked in the cabinets.
4. The owner after them (yes, there was at least one before me) also never cleaned out the cabinets.
Gross.
So, I'll leave that as the indication of the starting condition of my cabinets and kitchen before I started a little refurbishing. Hopefully I'll get to show you the final product soon!
On another note, I've been busy painting the guest bedroom all day. Painting the ceiling really slowed this show down. I still have a coat and a half to go! Here's what I started with...

Sad to say, the blue airplane stencil had to go. Stay tuned for the after pictures. They're gonna be sweet. I hope.
Peace out,
Kari
PS. Yes, I tossed all the extra percocet. After 24 years (FYI, that's just two less than I've been alive), I'm pretty sure it's expired.
Tuesday, August 9, 2011
There is a small sidewalk behind my house that goes from the gate next to the driveway around to the deck. At least, that's what I was told. Although it was hard to find under a thick coat of weeds. In an effort to make my back yard more presentable, I wanted to spruce up the sidewalk by... finding it. And then fixing it, but mostly finding it.
I didn't have a change to take a picture of the weed garden before I brutally assaulted it with a gallon of Round Up. It didn't survive. The problem was, all the dead weeds were EXACTLY where all the live weeds used to be... peeking up through the bricks with roots shoots at least 47 inches into the ground. At least. See below...

Lovely, huh? I definitely want to hang out near that sidewalk. So after weed killing, the next step was to get rid of the weeds. Which involved hours and hours of me, some gloves, and a little hand rake tool. digging out each weed between eat crack, one at a time.

 Note the difference between weeded and not. Also note again the empty flower bed. With the exception of that big green plant... I couldn't figure out if it was a plant or a big weed, so I left it assuming no one else would be able to tell (and therefore judge me) either.
And, about 2 weeks after starting, I finally finished pulling up all the weeds. I did in fact have to go back and spray the beginning again because the weeds were starting to come back... But don't worry, I stopped them.
Here's how it looked yesterday after I finished:

I didn't have a change to take a picture of the weed garden before I brutally assaulted it with a gallon of Round Up. It didn't survive. The problem was, all the dead weeds were EXACTLY where all the live weeds used to be... peeking up through the bricks with roots shoots at least 47 inches into the ground. At least. See below...


I made little piles of weeds as I went. Oh, and see in the background, that nice little grass-like plant in the otherwise empty flower bed? That's the beginning of my gardening...

And, about 2 weeks after starting, I finally finished pulling up all the weeds. I did in fact have to go back and spray the beginning again because the weeds were starting to come back... But don't worry, I stopped them.
Here's how it looked yesterday after I finished:

Ahhhh, soo many bricks! I did leave the big pile of stuff on the part of the sidewalk where the garbage cans sit... I figured it would look better than a couple big black bins.
So, given that this post was titled, "Part 1", I know you are all wondering what part 2 will involve. I promise you it will not involve weeding. I was thinking I would dig out the disintegrated bricks, replace them with new ones and reposition some that have slipped. Then I will spray the whole thing very well with the hose to pull up loose dirt. Then I'll spread some sand into the cracks and tamp it down to keep the bricks in place and keep the weeds from coming back. Then I will take a nap.
At least I can walk from the driveway to the deck without feeling like I'm going to get eaten by a fast-growing vine like a scene out of Jumanji...
Monday, July 18, 2011
For those of you not familiar with Young House Love, their Do-It-Yourself awesomeness, and their adorable bald baby, you should check them out. If you are already familiar with them, you'll know that Sherry, the female half of YHL, loves white ceramic animals. And, if a ceramic animals happens to not be white, she always has a can of spray paint handy to remedy the situation.
Well, I figured I'd channel my inner Sherry to turn an old keepsake from a bottom shelf bookend to a crisp white accent piece for a console table (I don't have the console table yet... but I'm planning ahead).
This is my elephant. When my grandma died, we were each allowed to choose one thing from her apartment to keep. I chose this elephant. It's occupied various homes over the last 15 years, and finally made itself comfortable propping up some books on my bookshelf. I decided it needed to come off the bench and take it's rightful place in the starting lineup of home decor (see that soccer reference there? In honor of world cup soccer...) So I busted out some white spray paint (which I have tons of given my current kitchen shelf painting project) and gave it a face lift.
This is circus elephant, before a few coats of white paint. He looks so happy!
![]()
![]()
![]()
![]()
Well, I figured I'd channel my inner Sherry to turn an old keepsake from a bottom shelf bookend to a crisp white accent piece for a console table (I don't have the console table yet... but I'm planning ahead).
This is my elephant. When my grandma died, we were each allowed to choose one thing from her apartment to keep. I chose this elephant. It's occupied various homes over the last 15 years, and finally made itself comfortable propping up some books on my bookshelf. I decided it needed to come off the bench and take it's rightful place in the starting lineup of home decor (see that soccer reference there? In honor of world cup soccer...) So I busted out some white spray paint (which I have tons of given my current kitchen shelf painting project) and gave it a face lift.
This is circus elephant, before a few coats of white paint. He looks so happy!


Then he got a few coats of paint. It definitely took a few because each coat seemed to miss some little crevice. It took many tries to get his whole trunk painted... tricky little loop. When it was all done, I left him to dry in my garage-turned-paint-shop (you'll be happy to know I've reclaimed it as an actual garage now). He looked a little like this.

He didn't lose his smile. Phew.
If you haven't noticed yet, this little circus elephant is hollow. So not only did I have to paint him, but I had to fill him with something. I decided to fill him with chocolate. Really, I decided he always needs to be filled with chocolate. That way, when I get around to having people over to my house (you know, where there's a place for them to sit, and a place for them to eat...), they will be greeted at the door by circus elephant filled with chocolate.
As I said above, the console table I plan on eventually sitting him on doesn't yet exist. And to be honest, it's not super high up on the "things to be purchased" list.. which is extensive. So for now, he'll wander from place to place. I stuck him up on the mantle tonight for a picture because everywhere else seemed to have crappy light.

You can see that he's already been stocked full of candy.
So, I think Sherry would be proud of this ceramic animal rehab. If you'd like to come see him for yourself, he'll be waiting with candy in hand. Unfortunately, you'll have to eat your kit-kat on the floor, because I have no functional chairs.
Baby steps, people. Baby steps.
Subscribe to:
Posts (Atom)